I recently shared how to build a preset in lightroom on my Instagram story, and I realized it would make an excellent photography tutorial for my website, as well.
I am a huge fan of Adobe Lightroom Classic and use it to edit most of my images. Although I will occasionally dive into Photoshop for larger edits, all my work is imported, organized and exported via Lightroom.
As I tend to shoot plenty of landscape images, there are certain settings that I apply to most images. Rather than use those sliders on every shot, I’ve built a preset that I can either apply on import or apply when I’m about to begin editing an image.
In this tutorial, I’ll teach you how to build an Adobe Lightroom Classic preset and show the settings I use on my landscape images.
How to Build a Preset in Adobe Lightroom Classic
To get started, open Adobe Lightroom Classic, select an unedited landscape image and jump to the develop module. From there, it’s a simple 4-step process to dial in the settings before creating the preset.
Step 1: Basic Panel – Adjusting the clarity

Clarity adjusts the contrast found in an images midtones – the information found in the middle of the histogram. Just be careful not to apply too much clarity, as it can quickly make an image look bad.
Personally, I find anything between +5-20 ideal, but I chose to apply +5 via my preset.
Step 2 – Detail Panel – Adjusting sharpening and noise reduction

There are three main settings in the detail panel; however, only two are routinely used: sharpening and luminance noise reduction. The third, color noise reduction, is most often left to the adobe standard setting that is already applied to all imported images.
For sharpening, there are four settings:
- Amount – increases the intensity of the sharpening across the entire image
- Radius – like a feather affect, radius adjusts how far sharpening will be applied from the edges within an image.
- Detail – this setting truly focuses on the details within an image, so it strongly affects the edges identified throughout an image.
- Masking – perhaps the most critical step in sharpening, masking affects what parts of an image will be affected. Try holding the alt key when adjusting this setting to see a black and white rendering of the image. The white portions will be sharpened, while the black portions won’t.
Luminance Noise Reduction
Luminance noise is the grain found in an image. As digital cameras keep improving, noise has become less and less of an issue, but it still occurs when shooting at higher ISOs.
Lightroom defaults this setting to zero but applying some noise reduction will often enhance an image. Be careful not to apply too much, as it can significantly affect sharpness.
Step 3: Lens Correction Panel – Check it!

In lens correction, there are only two settings: remove chromatic aberration and enable profile corrections. This step is simple; check both boxes.
If Lightroom doesn’t automatically find the lens profile, it is possible to manually select it using the dropdown menus.
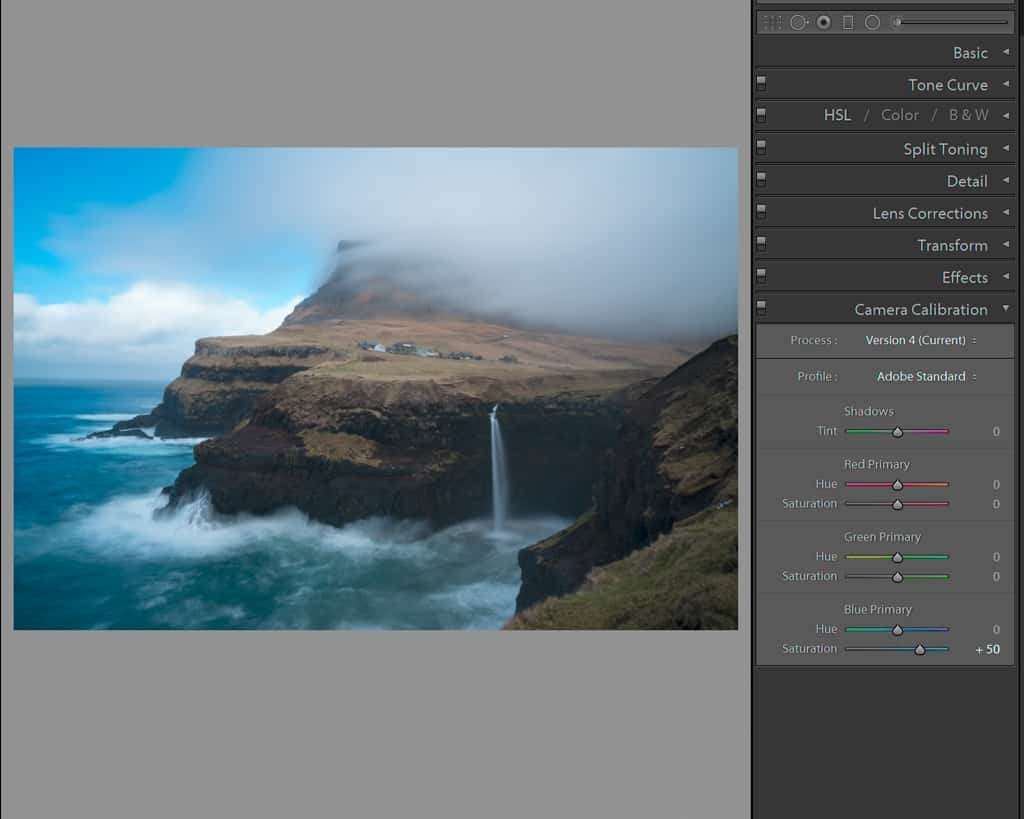
Step 4: Camera Calibration – add a splash of color

I owe this trick to Conor MacNeill, as he introduced it to me while we were teaching a photography workshop in the Faroe Islands. It’s an unreal way to add significant color throughout an entire image.
In this panel, the saturation sliders adjust all the red, green or blue color throughout the entire image. As blue pixels are found in all colors, this slider increases the saturation throughout the image, not just the blue portions as the HSL menu affects.
Summarizing my Adobe Lightroom Classic Preset Settings:
- Basic Panel – Clarity +5
- Detail Panel – Sharpening amount 50, radius 0.5, detail 100, masking 40
- Detail panel – Noise Reduction 18
- Lens Correction Panel – Check both boxes
- Camera Calibration Panel – Blue primary saturation 50
How to make the preset

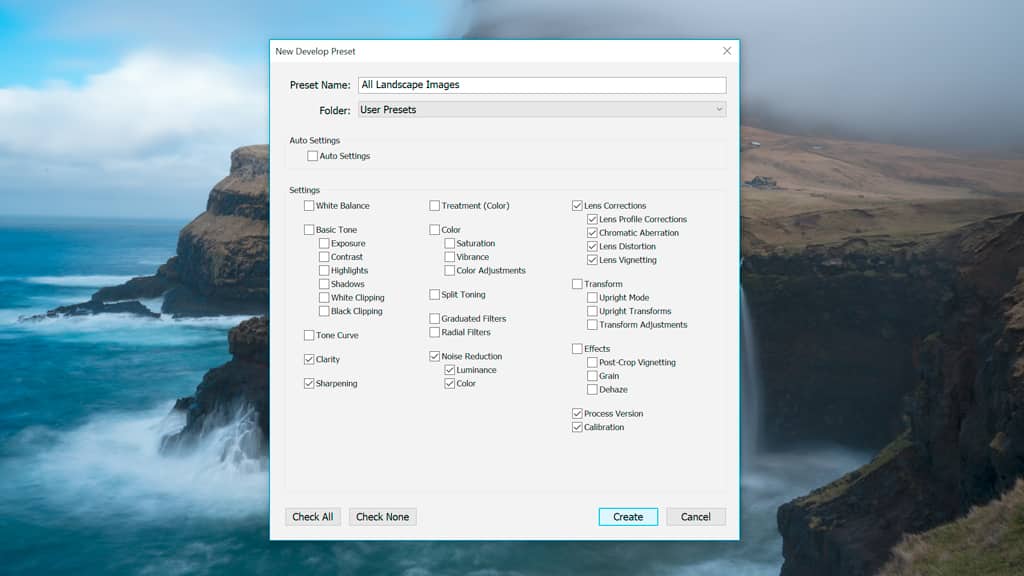
With these settings applied to an image, it’s quick and easy to create a preset. Simply navigate to the preset panel on the left-hand side of Lightroom and click the + sign.
When the dialogue box opens, name the preset (I use “All Landscape Images”) and check the adjusted settings.
With the preset saved, it’s possible to either apply it during import on individual images. To apply during import, locate the Apply During Import panel in Adobe Lightroom’s import menu and navigate to the correct preset. For individual images, simply select the image in the develop module and click the preset.
Other Adobe Lightroom Classic preset ideas
Although this preset is one I use on most of my landscape images, I have dozens built for different situations. I highly recommend them to speed up your workflow; however, consider building your own rather than purchasing or downloading presets created by other photographers.
Editing is an important part of photography and I believe it’s best to find your own style rather than mimic somebody else.
Other preset ideas you might find useful include:
- A dodge/burn gradient filter that masks half the image.
- Post-crop vignetting
- Shoot-specific white balance
Other recent photography tutorials
I’ve had a brief hiatus from my blog, as I was in the Faroe Islands teaching a photography workshop and missed a few of my weekly tutorials. My most recent posts include:
Leave a Reply