Throughout December 2017 and January 2018, astro-photographer Jack Fusco and I traveled across Alberta to photograph the six dark sky preserves. Over 20 days – spread across two trips – we drove more than 10000 km, watched northern lights in five of six dark sky preserves, and watched the Geminids Meteor shower in Jasper National Park.
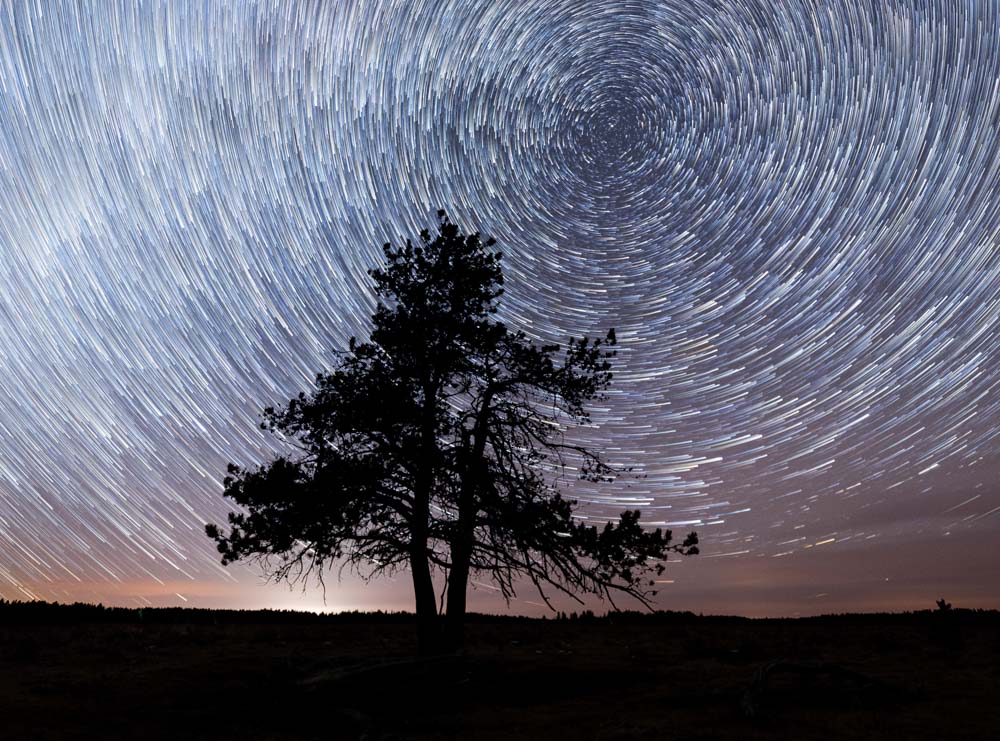
I’ve always enjoyed photographing the dark sky, but I usually enjoy freezing the night sky in place rather than shooting lengthy star trails. During this project I captured a few north facing image sequences for timelapses; however, I also knew they would create stunning star trail images for this tutorial.
Capturing and creating star trail images isn’t as hard as you’d expect, so let’s look look at the equipment required and the step-by-step guide to capturing these images! If you’re new to capturing the dark sky, start with my earlier tutorial: 7 Tips for Getting Started with Night Sky Photography
Star Trails Photography Gear Essentials
Night photography isn’t overly gear-intensive, but it does require several specific items that might not be in every photographer’s standard kit. Here’s what I recommend to photographers looking to get started:
- dSLR camera with good high-ISO performance at ISO3200.
- Fast wide-angle lens. Ideally, the focal length will be between 14-24 mm with an aperture between f1.4 and f2.8.
- Sturdy tripod. Not too cheap, not too light. Trust me.
- Sony Timelapse app or an intervalometer.
- Flashlight or headlamp.
- Computer with the free StarStax software installed
Step-by-Step Guide to Photographing Star Trails
Find the North Star
 In the northern hemisphere, stars appear to rotate around the north star. To locate the north star, first look for the big dipper. It’s one of the easiest constellations to spot in the night sky, so it shouldn’t take too long. Use the two stars at the top of the dipper as an arrow and it should be easy to locate.
Find a suitable composition

After locating the north star, it is important to compose an image that prominently shows the stars rotations. Ideally, the north star will have plenty of breathing room; it’s important not to compose with the north star too close to the edge of the frame or horizon.
Focus on Infinity
Undoubtedly the most important step in all photography situation, focusing in the right spot is critical to a compelling image. For dark sky images, forget what you’ve learned about focusing 1/3rd into the frame or on the image’s subject. The camera needs to be focused at infinity for the stars to be in focus. On many mirrorless cameras and dSLR cameras with liveview, it’s possible to zoom in using focus peaking and manually focus on the stars. If you typically look through the viewfinder to focus, you’ll find it impossible in the dark. Rather than experiment at night, spend time during the day to accurately find each lens’s unique infinity mark. Sadly, it isn’t always marked correctly on lenses.
Set the Exposure

After achieving focus and seeking out the best composition, it’s time to figure out the correct exposure. There are a wide variety of factors that go into this equation, but here’s a brief overview to help figure it out:
- The 500 Rule is a great baseline. Essentially, 500/focal length = the maximum shutter speed to freeze stars in place. (Example: 500/20 mm lens = 30 seconds).
- ISO values will always be higher when shooting without ambient light. Expect to shoot between ISO800 and ISO3200.
- Aperture will almost always be set wide open. Shooting between f1.4 and f2.8 lets plenty of light into the camera.
Single Exposure Option
Most photographers will choose to shoot multiple images and create star trails in post processing, but it is possible to capture a single frame with a bit of exposure math.
If the baseline exposure is ISO3200 f2.8 30″, the math proves ISO100 f/2.0 32 minutes would be an equal exposure and the resulting image would have long star trails.
Multiple Images Option

By far the option most photographers prefer, shooting multiple frames with the intention of stacking the images in post processing. It’s an easy process, but the technique differs on each camera. For Sony users, the timelapse app works best; for Nikon fan, the built in intervalometer does the job; and, finally, for Canon shooters, a wired intervalometer is the easiest option.
The principle is the same for all cameras. After setting the first exposure, the camera settings do not change. It’s merely a matter of deciding how many images are required. For star trails, anything from 30 minutes to two hours works.
The idea is to shoot continuously, so with a base exposure of ISO3200 f2.8 30″, set the camera to take 60 to 240 frames over 30 to 120 minutes, respectively.
Lightroom: Import, Edit, Sync, Export
 For photographers who opted for the single-exposure star trail method, this step is easier. Simply import the single image, edit it, and export.
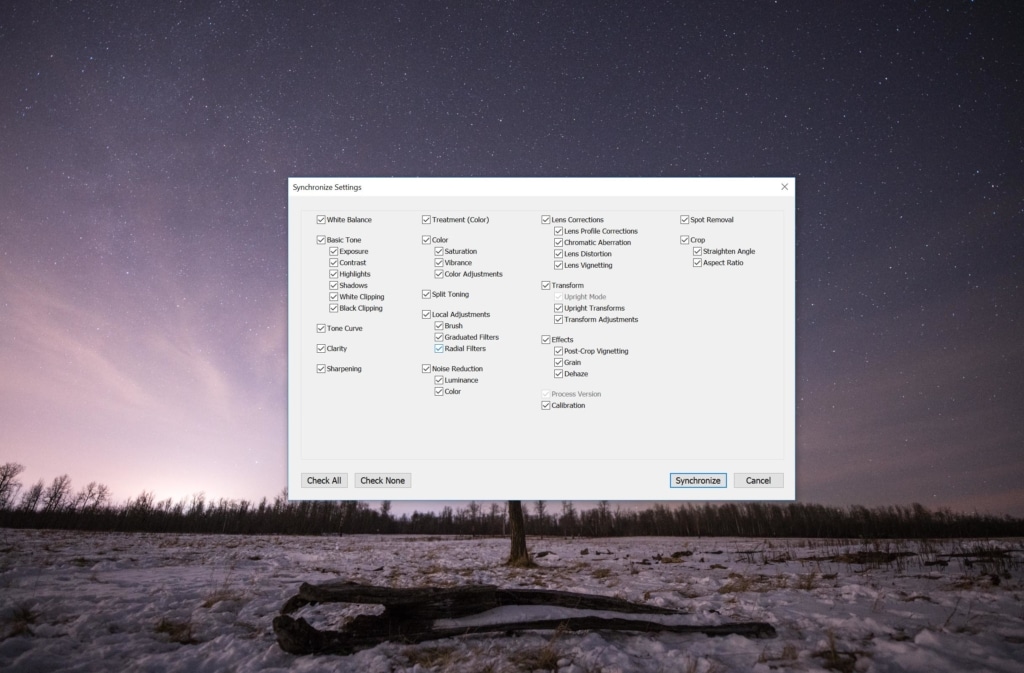
To get started editing a final image from the multi-image sequence, it’s important to use a systematic workflow. Begin by importing the entire batch of images into a single folder. Edit the first frame of the sequence so that it’s close to a finished product, albeit without the desired star trails.
With the first edit complete, select all the images in the sequence and click Lightroom’s Sync button. Check each box and synchronize the settings. Once this is complete, keep all of the images selected and export the images as jpegs into new folder.
Run StarStax
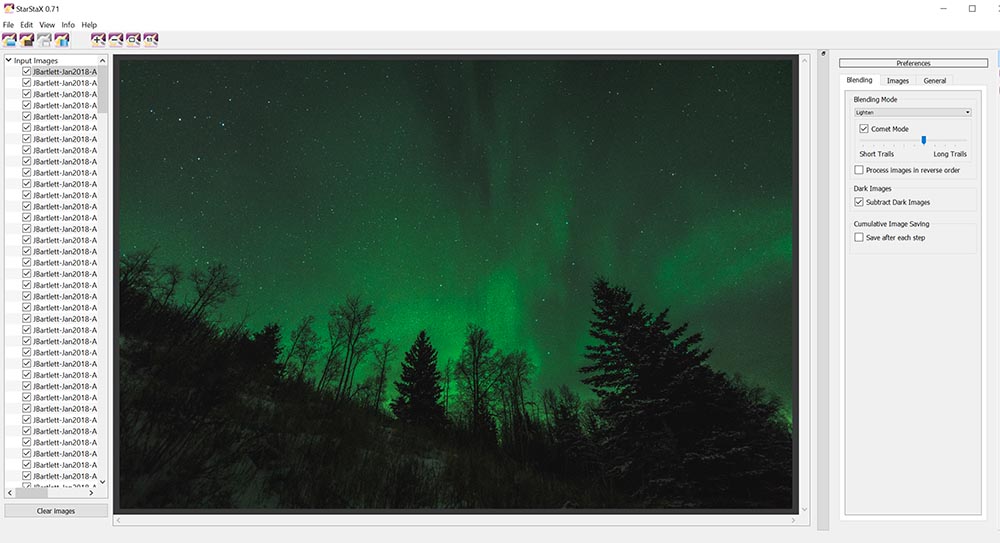 After the images export from Lightroom, launch the free StarStax software and either drag and drop the entire image series into the program or navigate to the folder using its “open” function.
With the images loaded into Starstax, make sure the blending mode is set to “Lighten” and highlight the comet mode setting. The only creative control within this app lies in selecting the length of the star trails using the visible slider. Once the desired settings are selected, click “start processing”. After a few seconds – or minutes, depending on computer speeds – the final image will appear. Simply save it as a tiff or jpeg and the star trail image is complete.
Share the Results!

After exporting the final image, make sure to share the results! Some popular night-sky hashtags include: #nightscaper, #nightsky_exclusive, #natgeospace and #astrophoto!
Good luck!
Leave a Reply